In order to create a new folder:
1. Find the New folder button in File Explorer and click on it. You can also right-click the spot wherever you want the folder to show up and choose New > Folder.
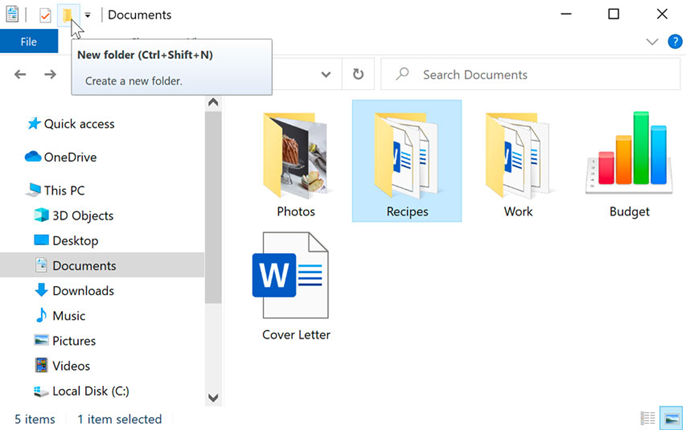
2. There will be a new folder. Type the name you want for the folder and hit the Enter key. We’ll call it School Documents for our example.
3.The new folder is going to be created. Now you can put files in this folder.
If you’re not in the folder menu. use the following steps;
When you’re organizing your files on your computer, creating new folders can help you keep things tidy and easy to find. Here’s how you can do it in File Explorer:
- Navigate to the Desired Location:
- Open File Explorer by clicking on the folder icon in the taskbar or pressing the Windows key + E on your keyboard.
- Take a moment to locate the directory where you want to create the new folder. This could be on your desktop, within an existing folder, or in a specific drive.
- Create the New Folder:
- Once you’re in the desired location, look for the “New folder” button in the File Explorer toolbar. It’s usually located near the top-left corner and is represented by a folder icon with a plus sign.
- Alternatively, you can create a new folder by right-clicking on an empty space within the directory where you want the new folder to be located. From the context menu that appears, select “New” and then “Folder.”
- Name the New Folder:
- After you’ve initiated the creation of a new folder, you’ll notice that a new folder icon appears in the current directory, and its name will be highlighted for editing.
- Click on the highlighted name or simply start typing to replace it with the desired name for the folder. This could be anything that helps you identify the contents of the folder easily. For example, if you’re creating a folder for school-related documents, you might name it “School Documents” or “Class Notes.”
- Confirm the Folder Name:
- Once you’ve entered the desired name for the folder, press the Enter key on your keyboard to confirm the name change. The folder will now be renamed to the specified name, and you’ll see it listed in the directory alongside other files and folders.
- Utilise the New Folder:
- Congratulations, you’ve successfully created a new folder! Now you can start organising your files by moving or copying them into this folder. Simply drag and drop files from their current location into the new folder, or use copy and paste commands to transfer them. This will help you keep your files neatly organized and easily accessible whenever you need them.
By following these simple steps, you can quickly create new folders in File Explorer and organize your files in a way that makes sense for you. Whether it’s for work, school, or personal use, having well-organized folders can save you time and frustration when searching for specific files.